


Are you eager to enhance your audio experience while working on your laptop? Look no further, as we have the perfect solution for you. In this article, we will guide you on how to connect studio monitors or speakers to your laptop effortlessly. By following these simple steps, you will be able to transform your laptop into a powerful audio system, providing you with crystal-clear sound and an immersive listening experience. So, let’s dive right in and explore the world of high-quality audio connectivity!


Hardware Requirements
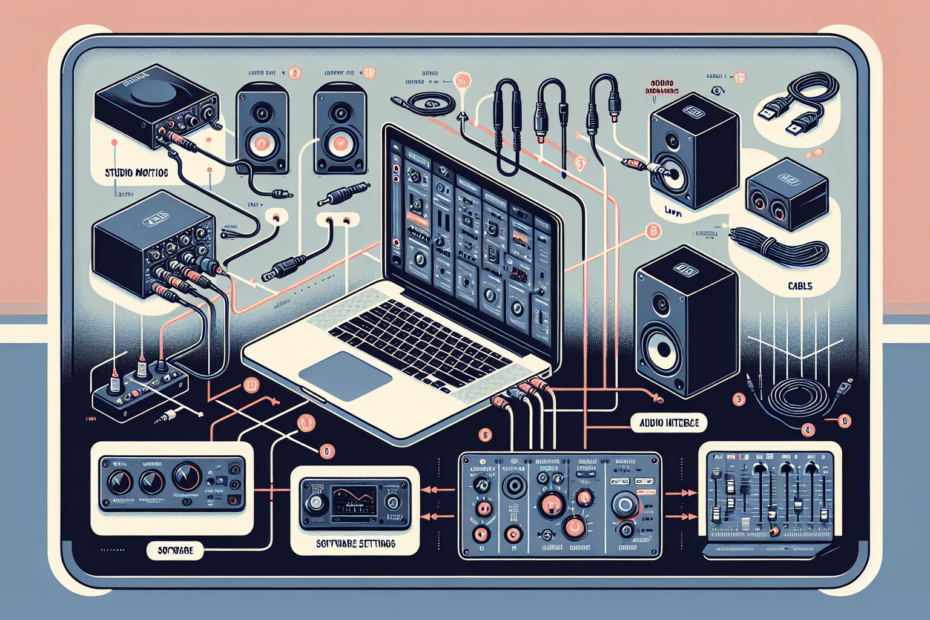
To connect studio monitors or speakers to your laptop, you will need a few essential hardware components. These include studio monitors or speakers, an audio interface, XLR cables or TRS cables, and power cables and adapters.
Studio Monitors or Speakers
The first thing you will need is a pair of studio monitors or speakers. These are specially designed for audio production and provide accurate and transparent sound reproduction. When choosing studio monitors, it’s important to consider factors such as size, frequency response, and power output to ensure they suit your specific needs.
Audio Interface
An audio interface acts as the intermediary between your laptop and the studio monitors. It converts digital audio signals into analog signals that can be played through the monitors. Make sure to choose an audio interface with the appropriate inputs and outputs for connecting your studio monitors.
XLR Cables or TRS Cables
XLR cables or TRS cables are used to connect the audio interface to the studio monitors. XLR cables are commonly used for professional audio applications, while TRS cables are commonly used for consumer applications. Choose the cable type that is compatible with both your audio interface and studio monitors.
Power Cables and Adapters
Lastly, you will need power cables and adapters for both the audio interface and the studio monitors. Ensure that you have the necessary cables and adapters to properly power on and connect all your equipment.
Connect Studio Monitors with XLR Cables
If you have chosen to connect your studio monitors using XLR cables, follow these simple steps:
Step 1: Power off studio monitors
Before making any connections, it’s important to turn off the power to your studio monitors. This helps prevent any potential damage to the equipment during the connection process.
Step 2: Connect one end of XLR cable to the audio interface
Take one end of the XLR cable and plug it into the appropriate output on your audio interface. This is usually labeled as “Outputs” or “Monitor Outputs.”
Step 3: Connect the other end of XLR cable to the studio monitor
Next, take the other end of the XLR cable and connect it to the input on the back of your studio monitor. Make sure the cable is securely plugged in to ensure a proper connection.
Step 4: Repeat the process for the second monitor
If you have a pair of studio monitors, repeat steps 2 and 3 for the second monitor. This will ensure that both monitors are properly connected and ready for use.
Step 5: Power on the studio monitors
Once all the XLR cables are securely connected, you can now power on your studio monitors. Make sure to follow the manufacturer’s instructions on how to properly power on the monitors to avoid any potential issues.
Connect Studio Monitors with TRS Cables
If you prefer to connect your studio monitors using TRS cables, follow these steps:
Step 1: Power off studio monitors
As with the previous method, start by turning off the power to your studio monitors.
Step 2: Connect one end of TRS cable to the audio interface
Take one end of the TRS cable and plug it into the appropriate output on your audio interface. This output is typically labeled as “Outputs” or “Monitor Outputs.”
Step 3: Connect the other end of TRS cable to the studio monitor
Connect the other end of the TRS cable to the input on the back of your studio monitor. Ensure a secure connection to maintain the quality of the audio signal.
Step 4: Repeat the process for the second monitor
If you have a pair of studio monitors, repeat steps 2 and 3 for the second monitor to properly connect both monitors.
Step 5: Power on the studio monitors
After all the necessary connections have been made, you can power on your studio monitors following the manufacturer’s instructions. This will ensure that both monitors are ready to deliver high-quality audio.
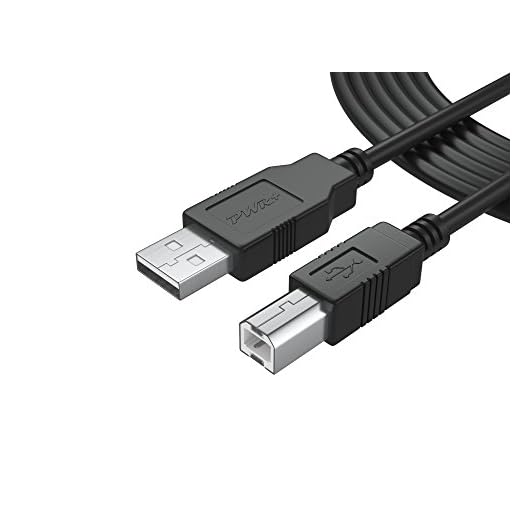
Connect Studio Monitors with USB
If your studio monitors support USB connectivity, here are the steps to connect them to your laptop:
Step 1: Power off studio monitors
Begin by turning off the power to your studio monitors to prevent any potential damage during the connection process.
Step 2: Connect one end of USB cable to the audio interface
Take one end of the USB cable and plug it into the USB output on your audio interface. This port is typically labeled as “USB” or “Computer.”
Step 3: Connect the other end of USB cable to the studio monitor
Connect the other end of the USB cable to the corresponding USB input on your studio monitor. Ensure a secure connection for optimal performance.
Step 4: Repeat the process for the second monitor
If you have a pair of studio monitors, repeat steps 2 and 3 for the second monitor to establish the connection.
Step 5: Power on the studio monitors
Now that all the necessary connections have been made, you can power on your studio monitors. Follow the manufacturer’s instructions to ensure the monitors are powered on correctly.

Connect Studio Monitors with Bluetooth
If your studio monitors offer Bluetooth connectivity, you can easily connect them to your laptop wirelessly. Here’s how:
Step 1: Power on studio monitors
Start by powering on your studio monitors. Depending on the specific model, this can typically be done using an on/off switch or a power button.
Step 2: Enable Bluetooth on your laptop
On your laptop, navigate to the settings or control panel and enable Bluetooth. This will allow your laptop to discover and connect to available Bluetooth devices.
Step 3: Open the Bluetooth settings and pair with the studio monitors
Open the Bluetooth settings on your laptop and search for available devices. Once your studio monitors appear in the list of available devices, select them and initiate the pairing process.
Step 4: Adjust audio output settings on your laptop
After successfully pairing your laptop with the studio monitors, adjust the audio output settings to ensure that the sound is routed to the monitors. Select the studio monitors from the available playback devices in your laptop’s audio settings.
Troubleshooting
While connecting studio monitors to your laptop is usually a straightforward process, you may encounter some issues along the way. Here are a few common problems and possible solutions:
No Sound from Studio Monitors
If you’re not getting any sound from your studio monitors, first ensure that all cables are securely connected. Check the volume levels on both your laptop and the studio monitors to make sure they are not set too low or muted. Additionally, verify that the correct audio output device is selected in your laptop’s audio settings.
Distorted Sound
Distorted sound can be caused by a variety of factors, such as incorrect cable connections or conflicting audio settings. Double-check all cable connections and make sure they are plugged in securely. Consider adjusting the gain or volume settings on your audio interface and studio monitors to find the optimal balance.
Audio Playback Issues
If you’re experiencing issues with audio playback, check for any conflicting audio drivers or software on your laptop. Make sure all drivers are up to date and compatible with your operating system. You may need to reinstall or update the drivers for your audio interface.
Driver Compatibility
Driver compatibility is crucial for seamless connectivity and optimal performance. Ensure that the drivers for your audio interface and studio monitors are compatible with your laptop’s operating system. Visit the manufacturers’ websites to download the latest drivers if needed.
Ground Loop Noise
Ground loop noise can manifest as a low-frequency humming or buzzing sound. To mitigate this issue, make sure all audio equipment is connected to the same electrical circuit or power strip. Additionally, consider using ground loop isolators or balanced cables to eliminate unwanted noise.
Adjusting Audio Settings in Windows
If you are using a Windows laptop, here’s how you can adjust the audio settings to ensure optimal sound output:
Step 1: Open the Sound settings in Windows
Navigate to the Windows settings by clicking on the Start menu and selecting the gear icon. From there, select the “System” category and click on “Sound” in the sidebar.
Step 2: Select the studio monitors as the default playback device
In the Sound settings, under the “Output” section, you will see a list of available playback devices. Select your studio monitors from the list and set them as the default device.
Step 3: Configure the audio settings as per your requirements
After selecting the studio monitors as the default playback device, you can further adjust the audio settings to suit your preferences. This includes adjusting the volume levels, enabling enhancements or spatial sound effects, and configuring specific output formats if available.
Adjusting Audio Settings in macOS
For macOS users, here are the steps to adjust the audio settings for your studio monitors:
Step 1: Go to the Apple menu and select System Preferences
Click on the Apple menu in the top-left corner of your screen and select “System Preferences” from the dropdown menu.
Step 2: Click on Sound
In the System Preferences window, locate the “Sound” icon and click on it. This will open the Sound settings for your Mac.
Step 3: Select the studio monitors as the output device
Within the Sound settings, navigate to the “Output” tab. From the list of available devices, choose your studio monitors as the output device. Make sure to select the appropriate option if you have multiple models or configurations.
Step 4: Adjust the audio settings as per your preferences
After selecting the studio monitors as the output device, you can further adjust the audio settings to suit your preferences. This includes modifying the output volume, configuring balance and sound effects, and adjusting the alert sounds.
Calibrating Studio Monitors
Calibrating your studio monitors is essential for accurate and reliable sound reproduction. Here are a couple of methods you can use to calibrate your monitors:
Using Reference Tracks
One popular method for calibrating studio monitors is by using reference tracks. These are professionally recorded and mixed songs that are well-known for their exceptional audio quality. By comparing your own mix to these reference tracks, you can identify any discrepancies and make adjustments accordingly.
Using Calibration Software
Another option is to utilize calibration software specifically designed for studio monitors. These software tools can analyze the frequency response and other acoustic characteristics of your monitors, allowing you to make precise adjustments to achieve a more accurate representation of your audio.
Final Tips
To ensure the best possible audio experience with your studio monitors, here are some final tips to keep in mind:
Invest in High-Quality Cables
Using high-quality cables for your audio connections can significantly improve the overall sound quality and reduce the chances of interference or signal degradation. Look for cables with sturdy construction, reliable connectors, and appropriate shielding.
Consider Room Acoustics
The acoustic environment plays a crucial role in the overall sound quality of your studio monitors. Take some time to assess and optimize the acoustics of your room by adding sound-absorbing materials, diffusers, and bass traps where needed. This will help eliminate unwanted reflections and resonances, resulting in a more accurate monitoring environment.
Regularly Update Drivers
To ensure compatibility and optimal performance, regularly check for driver updates for your audio interface and studio monitors. Manufacturers often release driver updates that address bugs, improve performance, and enhance compatibility with the latest operating systems.
By following these hardware and connectivity guidelines, troubleshooting tips, and calibration techniques, you can successfully connect your studio monitors to your laptop and enjoy high-quality audio reproduction for your music production or multimedia projects. Happy monitoring!