


If you ever find yourself facing the dreaded situation of a failed SSD or hard drive in your laptop, fear not! Good news awaits: you can actually replace these components and get your laptop up and running again. Whether you’re dealing with a failed SSD or hard drive, this article will provide you with all the essential information and steps to successfully replace the faulty component in your laptop. So, let’s dive in and discover how you can bring your trusty laptop back to life!
Understanding the Need for Replacement
Identifying signs of hard drive failure
If you suspect that your laptop’s storage drive is failing, it’s essential to be aware of the signs that indicate a potential problem. Common signs of hard drive failure include frequent system crashes, slow performance, unusual noises coming from the drive, files or folders that suddenly become inaccessible, and the infamous “blue screen of death.” If you encounter any of these signs, it’s crucial to address the issue promptly to prevent data loss and further damage to your laptop.

Implications of a failing SSD
Solid State Drives (SSDs) have gained popularity due to their faster performance and improved reliability compared to traditional Hard Disk Drives (HDDs). However, just like any other hardware component, SSDs can also fail over time. When an SSD starts to exhibit signs of failure, you may experience symptoms such as random freezes, booting issues, and files disappearing or becoming corrupted. Ignoring these signs can lead to permanent data loss, so it’s essential to take immediate action.
Need for immediate replacement
When it comes to failing storage drives, time is of the essence. Continuing to use a failing drive can increase the risk of permanent data loss and significantly impact your laptop’s performance. Additionally, if a hardware failure is left unaddressed, it may spread to other components of your laptop, leading to even more extensive and expensive repairs. Therefore, it’s crucial to replace a failed SSD or hard drive as soon as possible. This will not only restore your laptop’s functionality but also ensure the safety of your important files and data.
Types of Storage Drives
Hard Disk Drives (HDD)
Hard Disk Drives (HDDs) have been the primary storage solution for laptops for many years. They utilize spinning magnetic disks to store data, making them affordable for larger storage capacities. While HDDs are generally slower than SSDs in terms of read and write speeds, they remain a reliable and cost-effective choice for those seeking high-capacity storage options.
Solid State Drives (SSD)
Solid State Drives (SSDs) have revolutionized the storage industry, offering faster speeds and improved durability compared to HDDs. SSDs use flash memory chips to store and retrieve data, eliminating the need for moving mechanical parts. This results in significantly faster boot times, quicker application launches, and overall improved system performance. Although SSDs are generally more expensive per gigabyte than HDDs, their advantages in speed and reliability make them a popular choice for users who prioritize performance.
Hybrid Drives (SSHD)
Hybrid Drives, also known as Solid State Hybrid Drives (SSHDs), combine the best of both worlds by integrating a traditional HDD with a smaller SSD cache. This combination allows for improved performance while maintaining larger storage capacities. The SSD cache stores frequently accessed data, ensuring faster access times for those files, while less frequently accessed files reside on the traditional HDD component. Hybrid drives offer a cost-effective option for users who want a balance between performance and storage capacity.
Comparison of different types of drives
When choosing between HDDs, SSDs, or SSHDs, several factors need consideration. SSDs offer faster speeds, lower power consumption, and increased durability but are generally more expensive. HDDs, on the other hand, provide larger storage capacities at a lower cost but are slower and more prone to mechanical failures. SSHDs strike a balance between the two, with improved speed due to the integrated SSD cache. Ultimately, the choice depends on your specific needs, budget, and the trade-offs you’re willing to make in terms of speed, capacity, and cost.
Determining The Compatibility of a New Drive
Factors affecting compatibility
Before purchasing a replacement drive for your laptop, you must ensure compatibility with your system. Several factors can affect compatibility, such as physical size, interface type, and power requirements. Different laptops may have different form factors for their storage drives, including 2.5-inch, M.2, or NVMe. The interface types, such as SATA or PCIe, also vary, so it’s essential to determine which interface your laptop supports. Additionally, power requirements may differ, so it’s crucial to choose a drive that is within your laptop’s power limits.
Checking hardware specifications
To determine the compatibility of a new drive, it’s important to check your laptop’s hardware specifications. You can usually find this information in the user manual or by visiting the manufacturer’s website. Look for details regarding the supported form factors, interface types, and maximum storage capacities. By cross-referencing this information with the specifications of the replacement drive you’re considering, you can ensure a compatible match.
Understanding the laptop’s architecture
Understanding your laptop’s architecture can also provide insights into compatibility. Some laptops have specific slots or bays for storage drives, while others may have soldered or integrated drives that cannot be replaced. It’s important to research your laptop’s specific model and consult the manufacturer’s documentation to determine if replacing the storage drive is feasible. If your laptop’s architecture allows for drive replacement, familiarize yourself with the necessary steps to safely remove and install hardware components.
Choosing Between SSD and HDD
Differences in performance
When choosing between an SSD and an HDD, it’s crucial to consider the performance differences. SSDs offer significantly faster read and write speeds, resulting in quicker boot times and application launches. This improved performance can greatly enhance the overall user experience by reducing lag and increasing productivity. HDDs, on the other hand, are slower due to the mechanical nature of their operation. While HDDs may be adequate for tasks that don’t require intensive data access, they may become a bottleneck for demanding applications or multitasking.
Weighing cost and storage capacity
Another factor to consider when choosing between SSDs and HDDs is the cost and storage capacity. SSDs are generally more expensive than HDDs, primarily when it comes to higher storage capacities. If you require a large amount of storage at an affordable price, an HDD may be the more suitable option. However, if speed and performance are your priorities, investing in an SSD with a smaller storage capacity may be the better choice. It’s essential to weigh your budget against your storage needs to make an informed decision.
Understanding longevity and durability
Durability and longevity are also critical factors to consider when deciding between an SSD and an HDD. SSDs have no moving mechanical parts, making them less susceptible to physical damage caused by drops or shocks. Additionally, the lack of moving parts contributes to increased reliability and longevity as there are fewer components that can fail over time. In contrast, HDDs are more susceptible to mechanical failures due to their spinning disks and read/write heads. If you require a storage drive with heightened durability and longevity, an SSD is the recommended option.
Preparation Steps Before Replacement
Backing up data
Before replacing a laptop’s storage drive, it is crucial to back up all important data. This ensures that even if something goes wrong during the replacement process, your files will still be safe. There are several ways to back up data, including using external hard drives, cloud storage services, or creating disk images. Consider the amount of data you need to back up and choose a method that suits your preferences and available resources. Remember to double-check that your backup is complete and accessible before proceeding with the replacement.
Gathering necessary tools
To successfully replace a laptop’s storage drive, you’ll need specific tools to disassemble and reassemble your laptop. Commonly required tools include screwdrivers (often Phillips or Torx), a prying tool (such as a plastic spudger), and an antistatic wrist strap or mat to prevent static electricity from damaging sensitive components. It’s important to gather all the necessary tools before starting the replacement process to avoid delays or potential damage caused by using improper tools.
Creating a recovery disk
In addition to backing up your data, it’s recommended to create a recovery disk or USB drive before replacing your laptop’s storage drive. This will allow you to reinstall the operating system and necessary drivers on the new drive without complications. Many laptops offer built-in recovery options that facilitate creating a recovery disk. Alternatively, you can use third-party software to create a bootable USB drive containing the necessary files. Having a recovery disk ready provides peace of mind and ensures a smooth transition to the new drive.

Purchasing a Replacement Drive
Where to buy a new drive
When it comes to purchasing a replacement drive, you have several options. Physical electronics stores often carry a variety of storage drives, allowing you to see and compare different options in person. Online retailers also offer a wide selection of drives and can often provide competitive prices. It’s important to choose a reputable seller to ensure the authenticity and quality of the drive you’re purchasing. Consider reading customer reviews and checking seller ratings to make an informed decision.
Considerations when buying online
When buying a replacement drive online, there are a few factors to consider. Firstly, ensure that the drive you select is compatible with your laptop and meets your specific needs. Read product descriptions carefully and check that the drive includes any necessary accessories or cables. Secondly, consider the seller’s return policy and warranty terms. In the event that the drive is defective or incompatible, a clear and fair return policy will make the process smoother. Finally, compare prices across different online retailers to ensure you’re getting the best deal without compromising on quality.

Understanding warranty and customer support
Before finalizing your purchase, it’s essential to understand the warranty and customer support options provided by the drive’s manufacturer. Most reputable manufacturers offer a warranty period for their drives, protecting against defects or failures within a specified timeframe. Familiarize yourself with the warranty terms and any required actions, such as registering the product or contacting customer support. Additionally, review the manufacturer’s customer support options to ensure you can easily reach out for assistance if needed.
Step By Step Guide to Replacing a Hard Drive
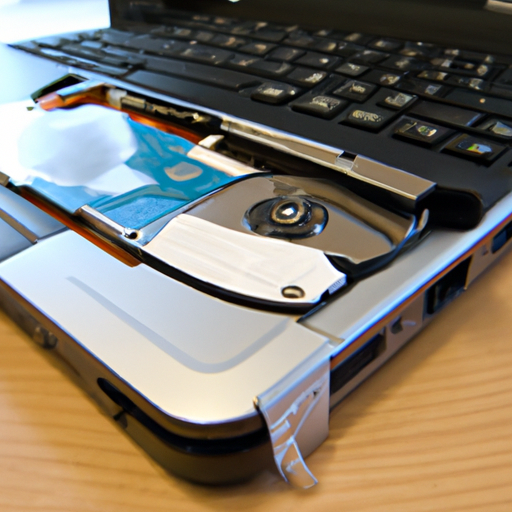
Removing the old drive
- Power off your laptop and disconnect any external power sources.
- Locate the access panel on the bottom of your laptop that covers the storage drive.
- Use a screwdriver to remove the screws securing the access panel.
- Gently lift the access panel and set it aside.
- Identify the existing storage drive and disconnect any cables or connectors attached to it.
- Remove any screws or brackets securing the drive in place.
- Carefully slide the old drive out of its slot or bay.
Installing the new drive
- Take the new drive out of its packaging, ensuring you handle it carefully and avoid touching the connectors or circuitry.
- Insert the new drive into the empty slot or bay, aligning it properly with any screw holes or connectors.
- Secure the drive in place using screws or brackets, making sure it is firmly seated.
- Reattach any cables or connectors that were previously disconnected from the old drive, ensuring a secure connection.
Ensuring proper connection
- Double-check all cable connections to ensure they are securely attached to the new drive.
- Replace the access panel on the bottom of your laptop and screw it back in place.
- Power on your laptop and ensure that the new drive is recognized by the system.
- If the drive is recognized, it’s a good idea to verify its functionality by accessing some files or performing a speed test.
- If the drive is not recognized, refer to the troubleshooting section or consult with a professional for further assistance.
Step By Step Guide to Replacing an SSD
Locating the SSD
- Power off your laptop and disconnect any external power sources.
- Refer to your laptop’s user manual or manufacturer’s documentation to locate the SSD.
- In most cases, the SSD will be located on the motherboard or in a designated slot.
Safely removing the SSD
- Before removing the SSD, ensure you are properly grounded by wearing an antistatic wrist strap or working on an antistatic mat.
- If the SSD is connected via a cable, gently disconnect the cable from the SSD using minimal force.
- If the SSD is in a slot, carefully remove any screws or brackets securing it in place.
- Slowly and carefully remove the SSD from its slot or connector.
Installing and testing the new SSD
- Take the new SSD out of its packaging, being cautious not to touch the connectors or circuitry.
- Align the new SSD with the slot or connector, ensuring that it is inserted correctly and fully seated.
- If applicable, secure the SSD in place using screws or brackets.
- Reconnect any cables that were previously disconnected from the old SSD, ensuring a secure connection.
- Replace any access panels or covers that were removed during the replacement process.
- Power on your laptop and verify that the new SSD is recognized by the system.
- Test the SSD’s functionality by accessing files or performing speed tests.
- If any issues arise or the SSD is not recognized, refer to the troubleshooting section or seek assistance from a professional.
Reinstalling an Operating System
Choosing an operating system
After replacing a laptop’s storage drive, you will need to reinstall the operating system. This provides a fresh start and ensures optimal performance with the new drive. Choose an operating system that is compatible with your laptop’s hardware specifications and fits your preferences. Popular options include Windows, macOS, and various Linux distributions. Be sure to consider any software or applications you regularly use to ensure they are compatible with the chosen operating system.

Guidelines for installation
- Obtain an installation media or an ISO file for your chosen operating system.
- Create a bootable USB drive or burn the ISO file to a DVD.
- Connect the installation media to your laptop and boot from it by accessing the BIOS or boot menu.
- Follow the prompts to begin the installation process, selecting the new storage drive as the destination for the operating system.
- Customize any settings or preferences during the installation, such as language, time zone, and user accounts.
- Wait for the installation to complete, and follow any additional prompts for initial setup.
Optimizing the OS for your new drive
Once the operating system is installed, it’s important to optimize it for your new drive to ensure maximum performance and longevity. Some steps you can take include disabling unnecessary startup programs, enabling TRIM (for SSDs), configuring power settings, and updating device drivers. Additionally, consider installing reputable antivirus software and enabling automatic updates to keep your laptop secure and up to date. These optimizations can help ensure a smooth and efficient experience with your replaced storage drive.
Troubleshooting Common Replacement Issues
Resolving compatibility issues
If you encounter compatibility issues after replacing a storage drive, such as the new drive not being recognized, there are a few steps you can take to troubleshoot. Firstly, double-check that the new drive is compatible with your laptop’s specifications, including form factor, interface type, and power requirements. If the drive is indeed compatible, try reconnecting all cables and connections to ensure they are securely attached. If the issue persists, consult the manufacturer’s documentation or seek assistance from a professional.
What to do if the laptop doesn’t recognize the new drive
If your laptop does not recognize the replaced drive, there are a few potential solutions. First, ensure that all connections to the new drive, including cables and connectors, are securely attached. If everything is properly connected, try accessing the BIOS or UEFI settings and checking if the drive is detected there. If the drive is not visible in the BIOS or UEFI settings, it may indicate a compatibility issue or a faulty drive. Consider consulting the manufacturer’s documentation or contacting their customer support for further assistance.
Dealing with installation errors
During the process of replacing a storage drive and reinstalling the operating system, you may encounter installation errors. Common errors include missing operating system files, disk read/write errors, or software installation failures. If you encounter an error, the first step is to restart the installation process and ensure that the installation media is not corrupted. If the error persists, try using a different installation media or download a fresh copy of the operating system. Additionally, consult the manufacturer’s documentation or seek assistance from their customer support for specific error troubleshooting steps.
By following these comprehensive steps and guidelines, you can confidently replace a failed SSD or hard drive in your laptop. Remember to prioritize compatibility, back up your data, and gather the necessary tools before beginning the replacement process. With careful preparation and careful execution, you’ll be able to enjoy the improved performance and reliability of a new storage drive in your laptop.